(Updated 2022-03-08: links to JT-Alert tutorial, K4 setup tutorial; added links to Meinberg NTP and Grid Tracker; updated screenshots of PSK Reporter & WSJTX 2.5.4)
Download and install the latest distribution from the WSJT-X project page. The documentation is well-written and useful.
Please, pretty please, verify your system clock is set accurately. Seriously. The FT8 cycles are 15 seconds, of which 12.6 seconds are transmit, 0.5 – 1 seconds of decode & lookup, and the rest left up to you to make a response. On Mac, this is done via command-line:
sudo ntpdate -u time.apple.com
As David (ac0vh) notes, MacOS 10.14 or newer:
sudo sntp -sS time.apple.com
On Windows, you can usually force it by selecting the “Adjust time and date.” It’s been suggested that Meinberg’s NTP download may work better. (NTP = Network Time Protocol) or use Dimension 4. If you have access to a GPS Dongle emitting NMEA format, you can use VisualGPS’ NMEATime2 to synchronize time. (Do be aware that the Windows machine going to sleep and powering down the GPS device will cause issues.)
Edit the preferences. In the General tab:
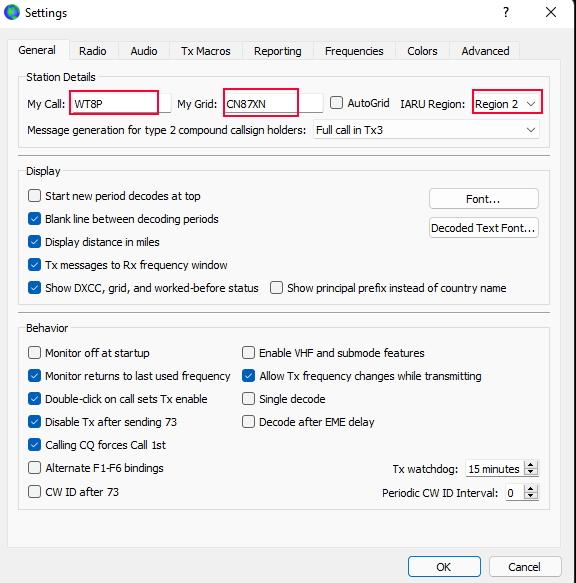
1. Enter your call sign.
2. Enter your Maidenhead grid.
3. This is optional, but if you choose your IARU region, it’ll help set up your frequency list later.
(optional) I like the program off by default as a reminder to set my system time. I also will disable transmit after sending the 73.
The Radio tab is going to vary depending on what you own.
For the Elecraft K4, there is a more detailed tutorial here.
For my Elecraft KX3: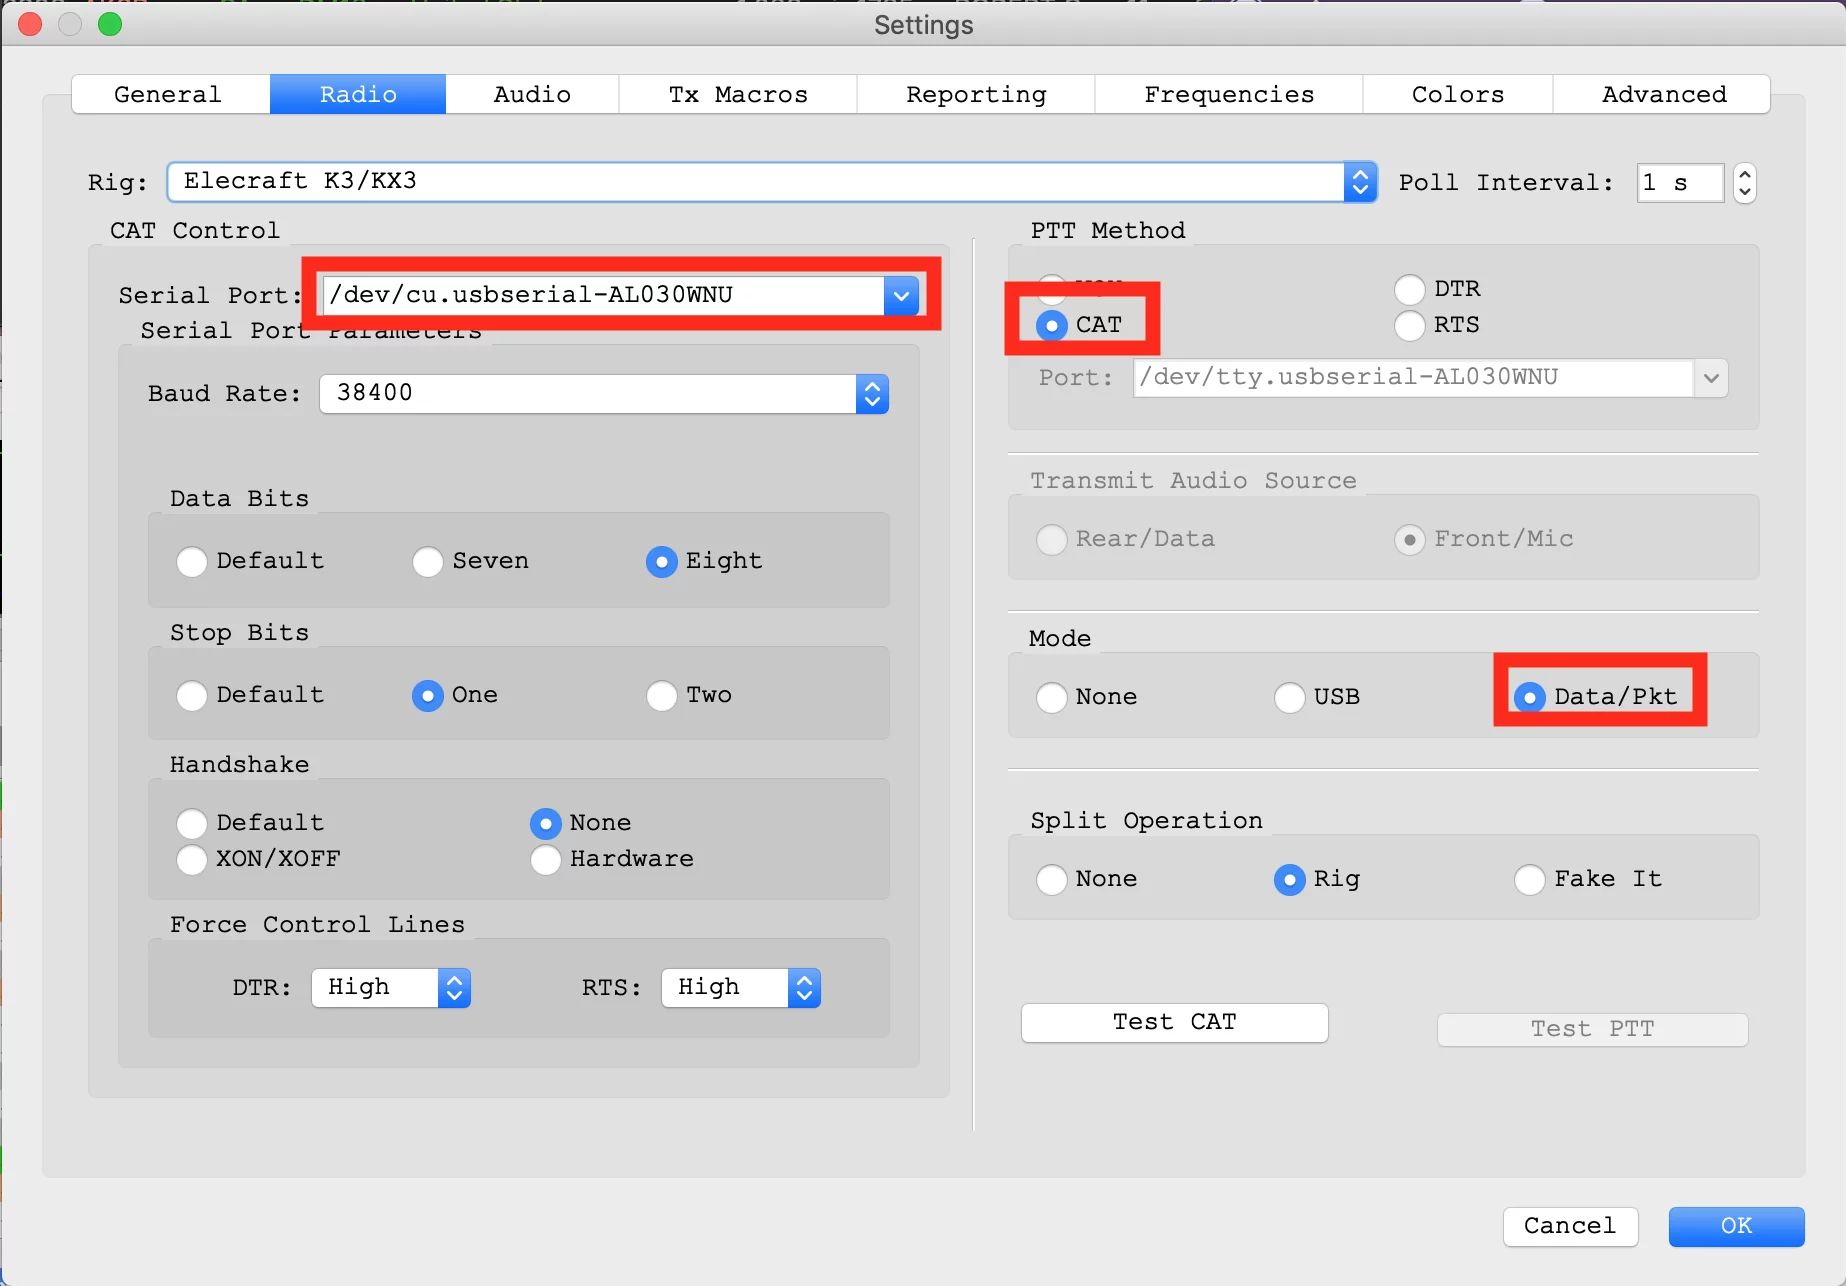
1. USB device for the control cable.
2. The computer controls the radio rather than using tones (like my HT does).
3. This tells the radio to use data mode, which disables compression, the RX/TX EQ, and uses a low error-rate ALC.
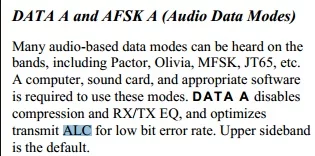
My Mac lacks a microphone, so I use an external USB dongle for both in and out. Generally, you want to use as little volume as necessary to avoid overloading the card.
The Elecraft radios need ALC (Automatic Level Control) gain on the radio -showing 4-5 bars. Some radios (e.g., ICOM) will require this off. Sound out from the radio (and into the sound card) is kept at a minimum. See below.
The reporting tab has several items of interest:

Enable PSK reporter Spotting will upload data to a (free) spotting service This is very useful because it lets you see that your station is being received. It’s also helpful to try the “grid square” option to see what’s being received from your home. Below shows stations heard from CN87 on 2022-03-08 at 17:20z:

In the second block, you can enable local broadcast (in this case, multicast) so complementary utilities can listen for things and perform useful actions such as automatically logging. On the Mac, JT-Bridge act as a layer to do lookups then instruct MacLoggerDX to upload them to QRZ.com. (Yes, this is overly complex.)
On Windows, JT-Alert to act as the bridge and also let you know if there is a geographical entity you need. W6AER has a useful tutorial on using them both. If you like maps, take a look at Grid Tracker.
Finally, the first time you use wsjtx, or if you update, you’ll need to load in frequencies. Right-click on the main window and select Reset. I skim through these to remove bands my radio doesn’t support (e.g., 2200m, microwave frequencies):
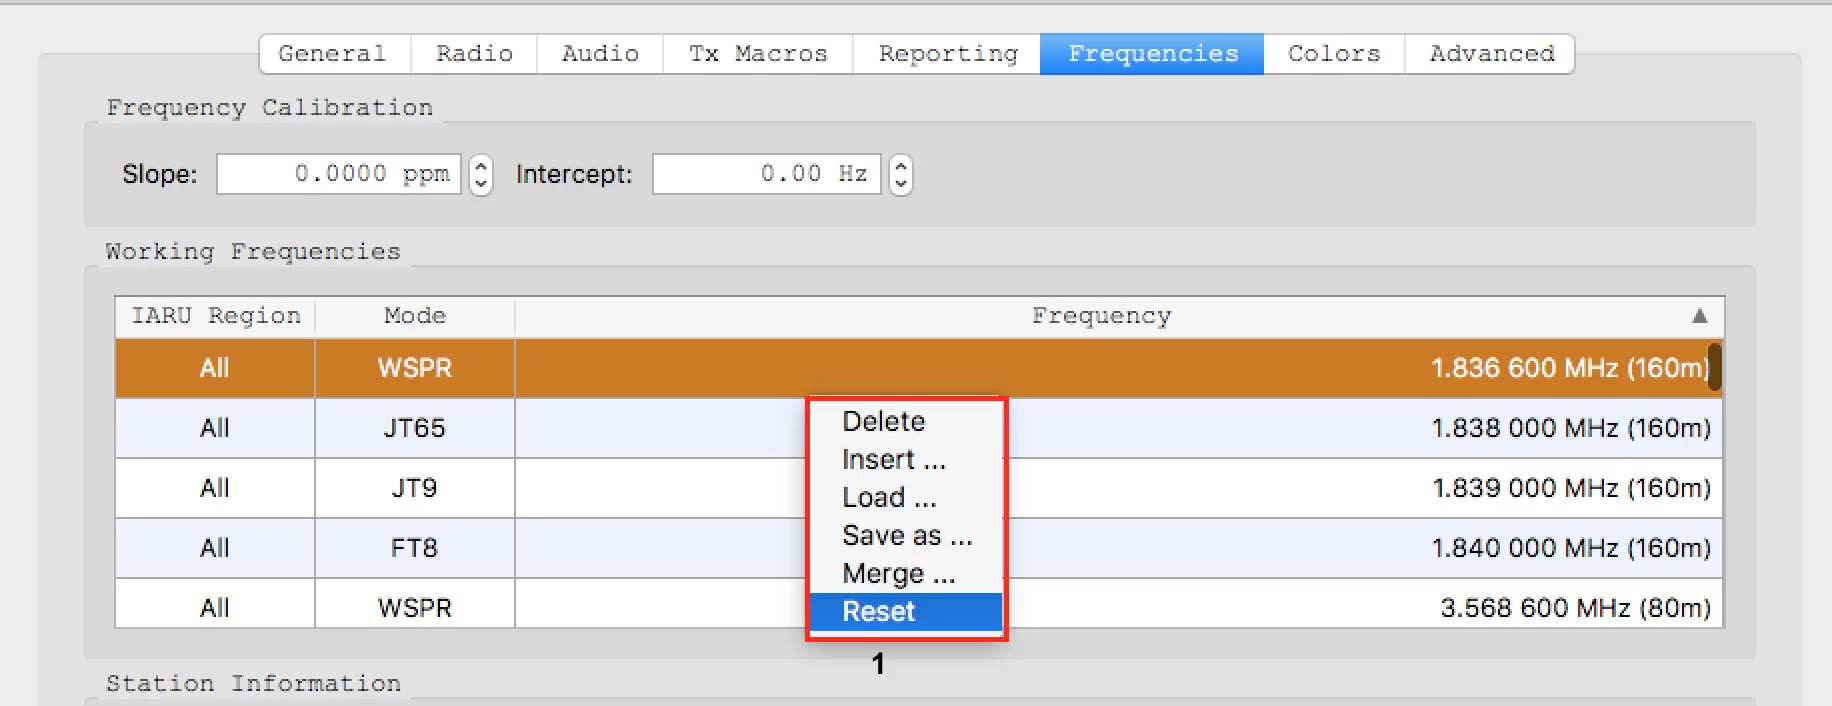
Right click and save these just in case you want to start over.
Okay, now that that’s set up, in the main window, there are four areas of interest:

- Select the “Monitor” button to start listening. The waterfall should start showing activity if there are users on. Once a full 15-seconds has elapsed, you should start seeing those signals being decoded. (On this display, I set the spectrum to 0% and then turn off the controls.)

2. On the bottom, left is a meter showing input levels. You want it to be in the green, ideally around 25-40db. If it’s too quiet, the bar will be yellow meaning you’re not getting enough signal. If it’s too loud, the bar will turn red indicating oversaturation.
3. Etiquette is that you try not to tromp over an existing user. Once you’ve staked out a spot, use the “Hold Tx Freq” button to stay there. Otherwise, your response will be jumping all around to the responder. (The only case I’ve found this to be helpful is if you have a QSO in progress that doesn’t seem to be completing, sometimes switching to the other person’s frequency can help. The problem is people forget to move back off that.)
4. The other two tick boxes are assistive automation. Auto Seq will progress through the calling sequence on each cycle. It’s necessary on FT8 because of the rapid cycle times (and my lack of cat-like reflexes). The Call 1st is used when you’re calling CQ – it will automatically select the first response (either by time or, in the event of a tie, the sub-frequency you’re monitoring followed by the order of sub-frequency).
If there is a lot of activity on the band, you may want to tick the “CQ Only” box in the left, middle.
The standard messages, on the bottom, right, are automatically generated when you respond to someone (by double-clicking on their CQ) or someone responds to you.
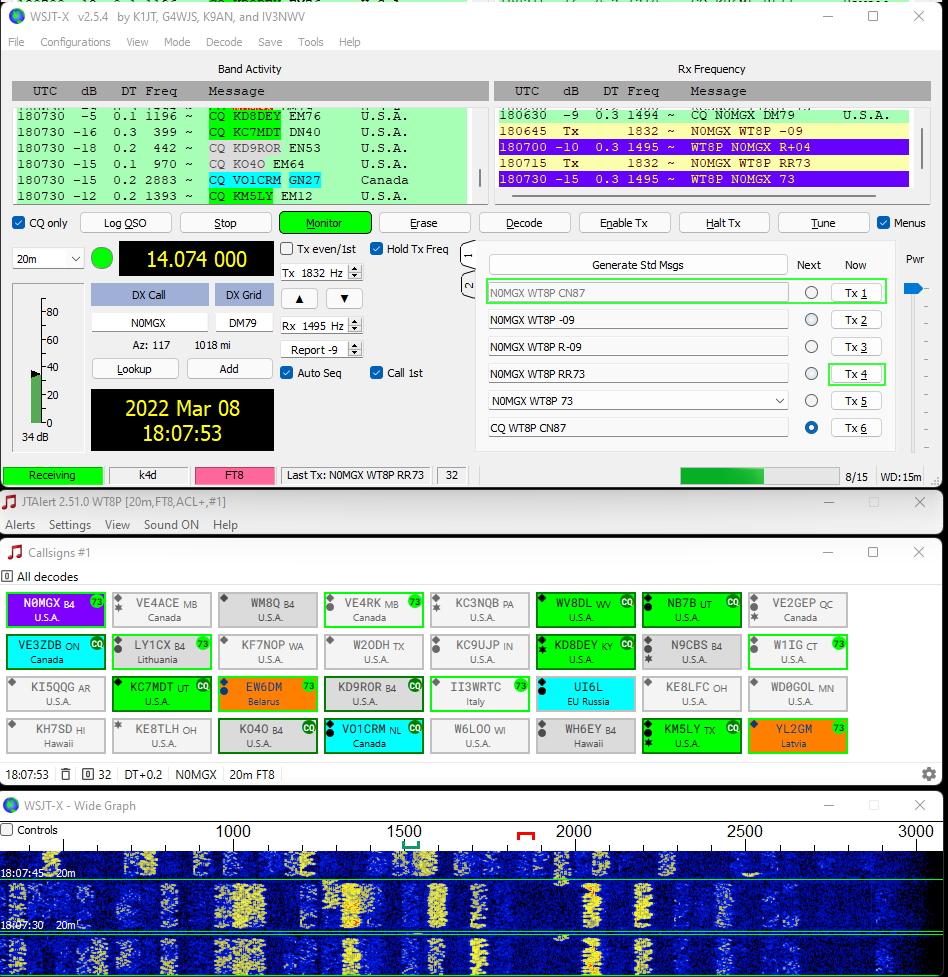
So now, here’s how a sequence works. The top quarter and bottom half of the graphic below are WSJT-X. Sandwiched in the middle is a third-party listener, JT-Bridge (or JT-Alert), that does lookups of people and lets me know if they’re in a geographic area of interest.
First, I have the Monitor button (in green) selected, so it’s listening. On the waterfall graph, outlined by the red rectangle are 15-second bursts of transmissions from NA4M calling CQ. To response, I double-click on the CQ at 02:05:45. (With JT-Bridge, I can also click on the one with the little number “3” next to it).
That action does the following things:
a) Pre-loads a set of standard messages (shown below) for the exchange.
b) Enables transmit (the Enable Tx button, currently off, because I’m doing this post-exchange)
c) Populates the Rx Frequency side with what’s happening on my receive frequency.
You’ll see in step (2), I respond, but he doesn’t acknowledge. He repeats his CQ 30 seconds later. I respond in step (3). When he acknowledges me with my signal strength in step (4), the line turns purple to let me know that someone’s talking with me. At that point, I return back to him with R-09 signal strength. At step (5) he acknowledges receipt, and then exchange regards.
This is the older, JT-Bridge sequence:

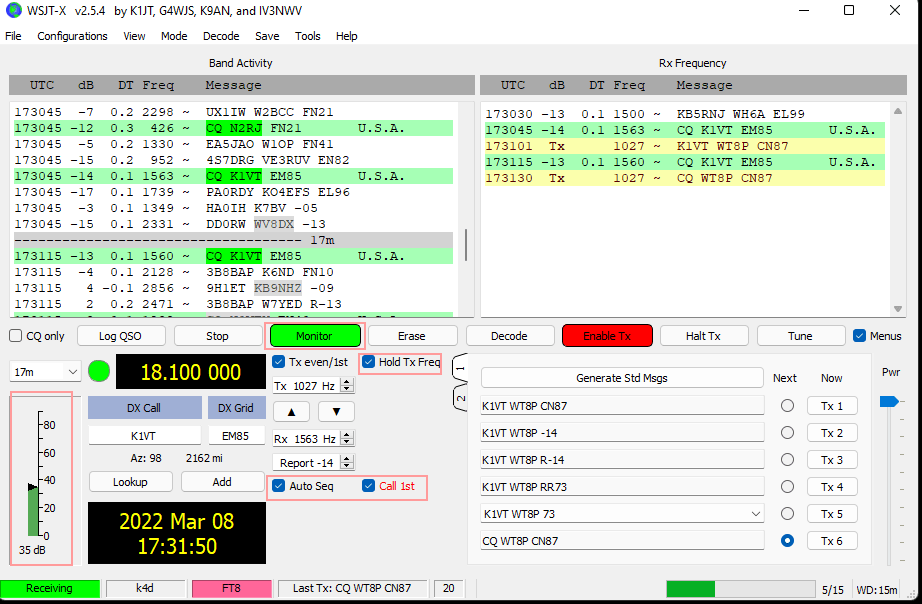
For an advanced tutorial on FT8, DXpeditioner Rob (N7QT) presented to the Spokane DX Club in September 2021. One of several useful things I learned is double-clicking on the TX1 button to forgo sending grid and double-clicking on the TX4 button will send RR73 instead of separate RRR and 73 sequences. When conditions are good, this can speed up contact from ~2 minutes to ~1 minute, sh own below. (JT-Alert is in the middle, decoding. I have assigned transmissions to me to appear in purple.)